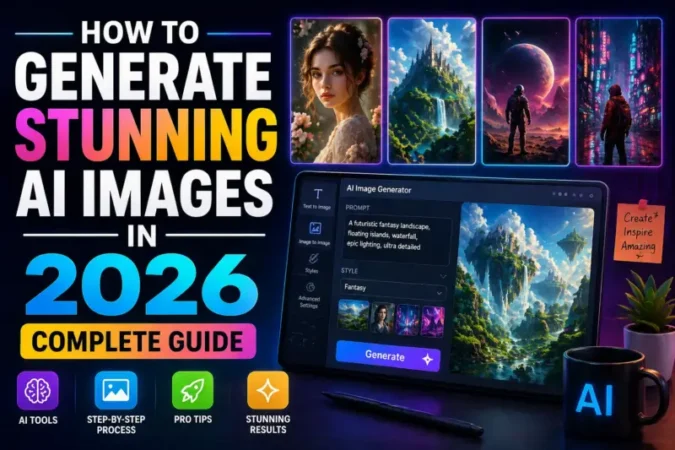
What you’ll learn: The exact prompt frameworks that produce professional AI images in ChatGPT and Gemini, how to control style, lighting, and composition, what separates weak prompts from high-performing ones, and the common mistakes that waste time and produce unusable results – all with real tested examples.
Why AI Image Generation Has Become a Core Skill in 2026
Learning how to generate AI images in 2026 is one of the most valuable skills a content creator, marketer, or blogger can build right now – and three years ago, doing this required specialist knowledge and access to tools that were not available to most people
In 2026, that barrier is almost entirely gone. ChatGPT’s DALL-E integration and Google Gemini’s image generation capabilities have put studio-quality visual creation inside the same interface that millions of people use every day for writing and research.
But here is what most guides on this topic get wrong: access to the tool is not the skill. The skill is knowing how to communicate with it. The difference between a prompt that produces an unusable generic image and one that produces exactly what you envisioned is not luck – it is a structured approach to prompt writing that can be learned systematically.
According to Adobe’s 2025 AI Creative Trends Report, 67% of marketing teams now use AI image generation as part of their regular creative workflow – making the ability to generate AI images in 2026 a core professional skill, not just a creative experiment. The professionals who deliver the best results are not the ones with the most creative ideas – they are the ones who understand how to translate those ideas into prompts that AI systems can act on precisely.
This guide covers exactly that. By the end you will have a repeatable framework for generating professional images in both ChatGPT and Gemini, understand what each platform does best, and have real prompt templates you can use immediately for blog images, social media, and marketing creatives.
It is also worth noting that AI image generation is just one part of a broader AI skill set reshaping digital careers in 2026. If you are exploring how these skills translate into professional income, our detailed guide on Prompt Engineer Salary and Job Outlook in 2026 covers exactly what companies are paying for AI prompt skills right now — from entry-level to senior roles across India and globally.
ChatGPT vs Gemini for Image Generation: An Honest Comparison
Before choosing which platform to use, it helps to understand what each one is actually good at. These are not interchangeable tools – they have genuinely different strengths, and choosing the wrong one for a given task will cost you time and produce inferior results.
The comparison below is based on direct testing across both platforms in early 2026, using identical prompts across a range of use cases including editorial imagery, product mockups, infographics, and portrait-style visuals.
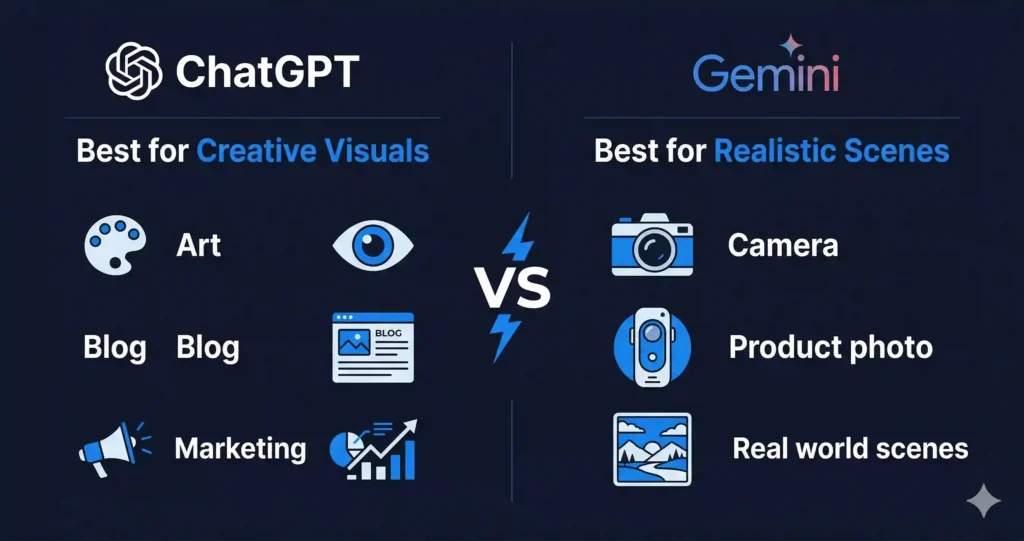
| Feature | ChatGPT (DALL-E 3) | Google Gemini |
|---|---|---|
| Image Quality | Excellent for creative and stylised visuals | Excellent for realistic and context-aware scenes |
| Prompt Understanding | Very strong – handles detailed, layered prompts well | Very strong – handles multimodal input including reference images |
| Realistic Photography Style | Good | Excellent |
| Illustration and Art Styles | Excellent | Good |
| Text in Images | Improved significantly in 2025 – now reliable | Reliable for short text |
| Reference Image Input | Limited in standard interface | Strong – can use uploaded images as style references |
| Editing Existing Images | Yes – with specific instructions | Yes – particularly strong with Gemini Advanced |
| Best Use Case | Blog images, marketing creatives, concept art, branded visuals | Realistic scenes, product photography style, contextual compositions |
| Access | ChatGPT Plus ($20/month) or API | Gemini Advanced ($19.99/month) or free tier with limits |
The practical takeaway: Use ChatGPT when you need creative, stylised, or brand-specific visuals. Use Gemini when you need realistic imagery, when you have a reference image to work from, or when you need the AI to understand complex real-world context.
Most serious content creators use both, selecting based on the specific image type they need. The prompt frameworks in this guide work across both platforms, with platform-specific notes where behaviour differs.
The Anatomy of a High-Performing Image Prompt
The single most important concept in AI image generation is that a prompt is not a description – it is a set of technical instructions. Most people write descriptions. Professionals write instructions.
Here is what that distinction looks like in practice:
Description (what most people write): “An image of someone working with AI”
Instructions (what produces professional results): “A professional developer at a minimal desk workstation, dual monitor setup showing code and AI dashboard interface, soft directional lighting from the left, shallow depth of field with blurred background, dark moody color palette, photorealistic, 4K, editorial style”
The second prompt works because it specifies every visual decision that would otherwise be left to chance: the subject, the environment, the lighting direction, the camera technique, the color mood, the quality standard, and the visual style. When you leave any of these elements unspecified, the AI makes a random choice – and random choices rarely match what you had in mind.
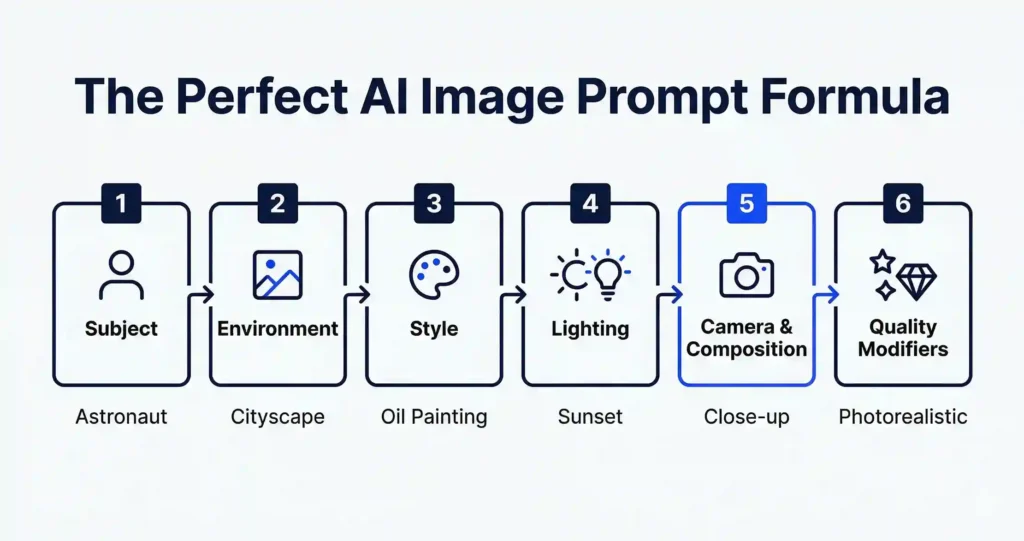
The Six-Element Prompt Framework
Every professional image prompt should address these six elements. You do not always need all six, but every element you include reduces the gap between what you imagined and what the AI produces.
Element 1 : Subject What is the main focus of the image? Be specific. “A person” is weak. “A female developer in her 30s wearing casual professional clothing” is strong. “A laptop” is weak. “A slim silver laptop open at 90 degrees on a light oak desk” is strong.
Element 2 : Environment Where is the subject? What surrounds it? An empty background is a valid choice, but it should be a deliberate one. “On a light grey studio background” is better than leaving it unspecified and getting a random outdoor scene.
Element 3 : Style What visual style should the image have? Photorealistic, editorial, cinematic, flat illustration, 3D render, watercolor, minimalist, brutalist graphic design – name it explicitly. If you have seen an image with a style you like, describe that style in words.
Element 4 : Lighting Lighting is the element most beginners skip and the one that most dramatically affects image quality. “Soft natural window light from the left,” “dramatic side lighting with deep shadows,” “golden hour warm light,” “cool studio lighting with white background” – each produces a completely different image from the same subject.
Element 5 : Camera and Composition How is the image framed? “Wide angle showing the full environment,” “close-up portrait with blurred background,” “top-down flat lay view,” “eye-level perspective” – these instructions tell the AI how to position the virtual camera, which controls how professional the final composition feels.
Element 6 : Quality Modifiers These tell the AI to prioritise detail and resolution. “Ultra realistic,” “sharp focus,” “high detail,” “4K,” “professional photography quality” all push the output toward higher fidelity. Use two or three of these at the end of every prompt.
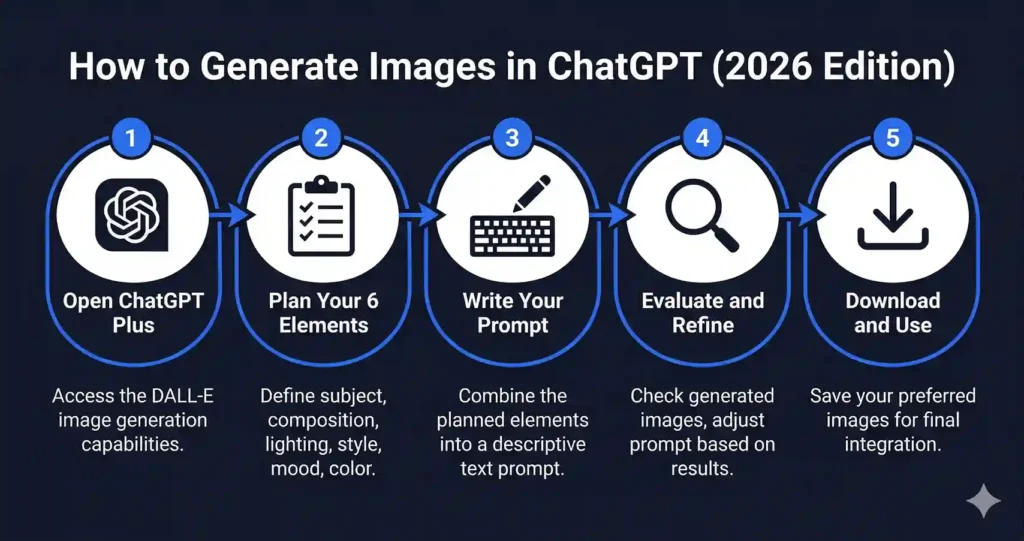
Step-by-Step: How to Generate Professional Images in ChatGPT
Step 1 : Access the Image Generation Feature
Open ChatGPT and ensure you are using a plan that includes DALL-E image generation currently the Plus plan at $20 per month. In the chat interface, image generation is available directly through the standard message input. You do not need to select a separate mode simply write your image prompt and ChatGPT will recognise it as an image request.
Step 2 : Write Your Prompt Using the Six-Element Framework
Before typing anything, plan your six elements. A practical approach is to write them out in a simple list first, then combine them into a single prompt. This takes an extra 60 seconds but dramatically improves your first-generation results.
Here is an example workflow:
Planning list:
- Subject: Professional workspace with AI interface on screen
- Environment: Modern minimal desk, light wood surface, white wall
- Style: Editorial photography style, clean and aspirational
- Lighting: Soft natural window light from the right
- Camera: Wide angle, slightly elevated perspective
- Quality: Photorealistic, sharp focus, 4K
Combined prompt:
A professional minimal workspace with a laptop displaying a glowing
AI chat interface, light wood desk surface, white background wall,
editorial photography style, soft natural window light from the right,
wide angle slightly elevated perspective, photorealistic, sharp focus, 4K
Step 3 – Evaluate and Iterate
Your first generation will rarely be perfect this is expected and not a problem. The process is iterative. Evaluate what the first image got right and what it missed, then refine your prompt to address the specific gaps.
Common refinements:
If the lighting is wrong: add more specific lighting direction – “light source directly above” or “backlit with soft rim lighting”
If the composition is wrong: specify the framing more precisely – “subject fills 60% of the frame” or “significant negative space on the left”
If the style is wrong: name a more specific style reference – “style of a minimalist Scandinavian design magazine” or “cinematic colour grade similar to a corporate brand shoot”
If unwanted elements appear: use a negative prompt instruction – add “do not include text overlays, do not include people, do not include cluttered backgrounds” at the end of your prompt
Step 4 – Request Variations
Once you have a result that is close to what you need, ask ChatGPT for variations rather than regenerating from scratch. Type: “Generate three variations of this image with different lighting one warm, one cool, one dramatic” this preserves the elements working well while testing alternatives for the elements you want to refine.
Step 5 – Finalise and Download
When you have an image you are satisfied with, right-click on it in the ChatGPT interface and save it. For blog use, images are typically downloaded at the resolution ChatGPT generates them (usually 1024×1024 or 1792×1024) and then cropped or resized for your specific format in a tool like Canva, Adobe Express, or Photoshop.
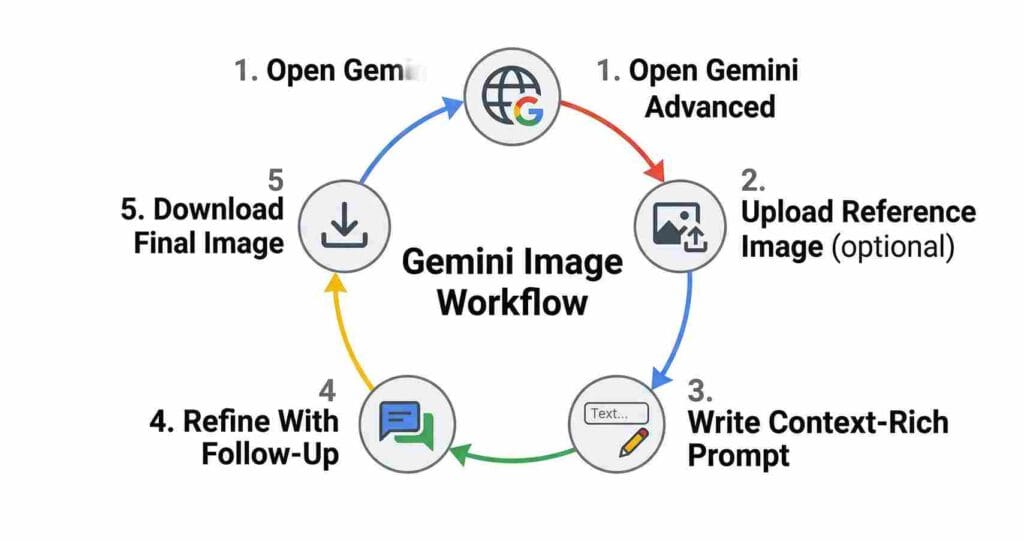
Step-by-Step: How to Generate Professional Images in Google Gemini
Step 1 : Access Gemini and Choose the Right Version
Google Gemini offers image generation through gemini.google.com. The free tier includes limited image generation. Gemini Advanced ($19.99 per month as part of Google One AI Premium) provides higher quality outputs, more generations, and the ability to upload reference images – which is one of Gemini’s strongest differentiators.
Step 2 : Use Reference Images for Better Results
Gemini’s most significant advantage over ChatGPT for image generation is its ability to use uploaded images as style or composition references. If you have an image that has the style, color palette, or composition you want, upload it alongside your prompt. Gemini will use it as a visual reference without copying it directly.
This is particularly useful for maintaining visual consistency across a content series. Upload your existing brand image and ask Gemini to generate new visuals “in the same style and color palette as the reference image.”
Step 3 : Write Context-Rich Prompts
Gemini responds particularly well to prompts that establish context not just what the image should look like, but what it is for and what feeling it should convey. Where ChatGPT responds well to technical visual specifications, Gemini responds well to both technical specifications and contextual framing.
Example of a context-rich Gemini prompt:
Generate a professional image for a blog article about AI career
opportunities in 2026. The image should feel aspirational and
tech-forward a clean modern office environment with a person
working at a large monitor displaying data visualisations,
soft corporate lighting, wide angle, realistic photography style,
high resolution. The mood should be optimistic and professional,
suitable for a career advice publication.
Step 4 : Use Gemini for Realistic Product and Scene Photography
Gemini consistently outperforms ChatGPT for photorealistic scenes that need to feel grounded in the real world product photography style images, realistic office environments, natural outdoor scenes, and images where accuracy to real-world objects matters. For these use cases, specify: “photorealistic,” “natural lighting,” “no AI-art aesthetic,” and “realistic proportions.”
Step 5 : Edit and Refine Within the Conversation
Like ChatGPT, Gemini maintains conversation context, which means you can refine images through follow-up instructions rather than starting from scratch. Effective follow-up instructions include:
- “Keep everything the same but change the background to a darker tone”
- “Make the lighting warmer and more golden”
- “Crop this to a square format with the subject centered”
- “Generate the same scene but from a top-down perspective”
Advanced Prompt Techniques That Dramatically Improve Results
Once you are comfortable with the six-element framework, these advanced techniques will push your output quality significantly further.
Negative Prompts: Telling the AI What to Avoid
A negative prompt is an instruction about what you do not want in the image. In ChatGPT and Gemini, you add these at the end of your main prompt as explicit exclusions. This technique is particularly useful for avoiding the most common AI image problems.
Most effective negative prompt additions:
Do not include: extra fingers or hands, distorted faces,
blurry areas, text overlays, watermarks, cluttered backgrounds,
unrealistic proportions, cartoonish elements
For professional business images specifically, add:
Do not include: stock photo aesthetic, overly posed subjects,
artificial smiles, generic office clichés
Style Stacking: Combining Multiple Style References
Rather than naming one style, you can stack multiple style descriptors to create a hybrid aesthetic that is more specific than any single style alone. This is one of the most effective techniques for getting distinctive results.
Examples of effective style stacks:
- “Editorial photography style with cinematic color grading and minimal Scandinavian design aesthetic”
- “Corporate brand photography with tech startup visual language and clean white space composition”
- “Infographic illustration style with a flat design aesthetic and data visualization elements”
Lighting Specificity: The Highest-Impact Single Change
Of all the elements in a prompt, lighting specification produces the most dramatic quality improvement for the least additional prompt length. These are the most effective lighting descriptors to know:
For professional product and workspace images: “Soft diffused studio lighting, no harsh shadows, clean and even illumination”
For editorial and magazine-style images: “Directional natural light from a large window on the left, soft shadows, warm neutral color temperature”
For dramatic and high-impact visuals: “High contrast side lighting, deep shadows on the opposite side, single strong light source”
For tech and AI-themed content: “Cool blue ambient lighting, subtle glow from screens, dark environment with bright focal points”
Aspect Ratio and Dimension Control
Different platforms and use cases require different image dimensions. Specify these in your prompt to avoid cropping or distortion:
| Use Case | Dimensions to Specify in Prompt |
|---|---|
| Blog feature image | 1200 x 630 pixels, landscape 16:9 |
| Instagram post | 1080 x 1080 pixels, square format |
| Instagram story | 1080 x 1920 pixels, portrait 9:16 |
| Twitter/X header | 1500 x 500 pixels, wide banner |
| Pinterest pin | 1000 x 1500 pixels, portrait 2:3 |
| LinkedIn article cover | 1920 x 1080 pixels, landscape |
Ready-to-Use Prompt Templates for Common Content Needs
These templates are structured using the six-element framework and tested across both ChatGPT and Gemini. Copy them directly and modify the bracketed elements for your specific needs.
Blog Feature Image Template
A [subject description] in a [environment description],
[style] aesthetic, [lighting description], [camera angle]
perspective, [color palette], ultra realistic, sharp focus,
4K, professional photography quality.
Do not include text overlays, watermarks, or stock photo aesthetic.
Filled example : AI career article:
A professional developer reviewing AI dashboard data on dual monitors
in a minimal modern office, editorial photography aesthetic,
soft natural light from a large left-side window, eye-level wide angle
perspective, cool navy and white color palette, ultra realistic,
sharp focus, 4K, professional photography quality.
Do not include text overlays, watermarks, or stock photo aesthetic.
One important consideration when creating blog images with AI tools is understanding how AI-generated content as a whole performs in search engines. If you are publishing AI-assisted content alongside AI-generated images, it is worth reading our in-depth analysis of AI vs Human Content: Which Actually Ranks Better on Google in 2026? – it covers exactly how Google treats AI-assisted content and what the ranking data actually shows, which directly affects how you should approach your overall content strategy.
Social Media Visual Template
[Subject] in [environment], [style] style, [lighting],
[composition], vibrant [color] accents, high contrast,
ultra detailed, optimised for social media, square format 1080x1080.
Filled example : AI tools post:
Futuristic AI interface with glowing data visualisations floating
in a dark digital environment, cyberpunk illustration style,
dramatic neon blue and purple backlighting, centered composition
with strong focal point, vibrant electric blue accents,
high contrast, ultra detailed, optimised for social media,
square format 1080x1080.
Infographic Background Template
Clean minimal [color] background with subtle [texture or pattern]
texture, [style] design aesthetic, [lighting] effect,
no text, no subjects, designed as an infographic background,
high resolution, 1200x630 landscape.
Filled example:
Clean minimal dark navy background with subtle circuit board
pattern texture at very low opacity, modern tech design aesthetic,
soft blue ambient glow effect concentrated in the center,
no text, no subjects, designed as an infographic background,
high resolution, 1200x630 landscape.
Product Mockup Template
[Product] on [surface], [environment], [style] product photography,
[lighting], [camera angle], realistic materials and shadows,
white or [color] background, commercial photography quality, 4K.
The Most Common AI Image Generation Mistakes
After testing hundreds of image prompts across both platforms, the same mistakes appear repeatedly in the results that people share publicly. Avoiding these will save you significant time.
Mistake 1 : Prompts that describe intention rather than appearance “An inspiring image about AI” is an intention, not a visual description. AI systems cannot interpret abstract concepts they need visual instructions. What does “inspiring” look like? What does “AI” look like in the image? Specify both.
Mistake 2 : Conflicting style instructions Asking for “photorealistic cinematic 3D render illustration style” gives the AI four contradictory style directions simultaneously. Pick one primary style and one secondary modifier. More than two style descriptors in conflict will produce inconsistent or muddled results.
Mistake 3 : Skipping the iteration step Many people generate one image, decide AI “does not work,” and give up. Professional AI image generation is a refinement process, not a single-shot output. Budget at least three to five generations per final image when you are starting out. That number drops as you develop a feel for how your preferred platform interprets different prompt structures.
Mistake 4 : Ignoring composition in the prompt Composition how elements are arranged within the frame is what separates amateur-looking AI images from professional ones. Always specify where the main subject sits in the frame, how much of the frame it occupies, and what the relationship between foreground and background should be.
Mistake 5 : Not specifying what the image is for Adding context about the intended use “for a professional blog article header,” “for a LinkedIn post,” “for an e-commerce product page” helps both ChatGPT and Gemini calibrate the formality, style, and composition of the output toward that use case.
Frequently Asked Questions
What is the best AI image generator in 2026 – ChatGPT or Gemini?
Neither is definitively better they are better at different things. ChatGPT with DALL-E 3 produces superior results for stylised creative imagery, illustrated content, branded visuals, and blog feature images with strong aesthetic direction. Google Gemini produces superior results for photorealistic scenes, images requiring real-world accuracy, and workflows where you have a reference image to guide the output. Most professional content creators use both, selecting based on the specific requirements of each image.
Do I need to pay for ChatGPT or Gemini to generate images?
For ChatGPT, image generation requires a Plus subscription at $20 per month. The free tier of ChatGPT does not include DALL-E image generation as of early 2026, though this may change. For Gemini, limited image generation is available on the free tier, but Gemini Advanced ($19.99 per month as part of Google One AI Premium) provides significantly higher quality outputs and the ability to use reference images. Both platforms offer monthly subscriptions with no long-term commitment required.
Why does my AI-generated image look wrong even with a detailed prompt?
The most common reason is conflicting instructions within the prompt. When a prompt contains contradictory style, lighting, or composition directions, the AI averages them out or makes an arbitrary choice producing something that matches none of your instructions well. Review your prompt for conflicts before generating. The second most common reason is insufficient specificity in the composition direction without knowing where to place the main subject in the frame, AI systems default to centered compositions that often look generic.
Can I use AI-generated images commercially?
For images generated through ChatGPT, OpenAI’s usage policies permit commercial use of generated images, provided they comply with the content policies and you own the rights to any input materials used. For Google Gemini, Google’s terms of service similarly permit commercial use within the bounds of their content policies. Always verify the current policies directly on each platform before commercial use, as these terms are updated periodically.
How do I keep a consistent visual style across multiple AI images?
Consistency across multiple images requires saving your exact prompt structure particularly the style, lighting, and color palette elements and reusing those elements across every generation in the series. Create a “style template” prompt for your brand that you paste at the start of every new image prompt. In Gemini, uploading a previously generated image as a style reference is an even more reliable method for maintaining visual consistency.
Can AI image generators add text to images reliably?
Both ChatGPT and Gemini have improved significantly at rendering text within images in 2025 and 2026, but accuracy is still not 100% reliable for longer text or complex typography. For short text overlays a title, a label, a short phrase both platforms now handle this well when you specify the exact text in quotes within your prompt. For longer text or situations where accuracy is critical, generate the base image without text and add the text in a separate design tool like Canva or Adobe Express.
What image dimensions should I specify for blog posts?
The standard blog feature image size that works across most WordPress themes and social media sharing is 1200 x 630 pixels in landscape orientation. This is also the standard Open Graph image size, meaning it will display correctly when your article is shared on LinkedIn, Facebook, and Twitter. Specify this in your prompt as “1200 x 630 pixels, landscape 16:9 ratio” to ensure the composition is designed for that format from the start.
How many iterations should I expect before getting a usable image?
For users new to AI image generation, three to seven iterations is typical before reaching a result that meets professional standards. This drops to one to three iterations as you develop familiarity with how your preferred platform interprets different prompt structures. Tracking which prompt changes produced which improvements even in a simple notes document accelerates this learning curve significantly. Most experienced AI image creators maintain a personal library of prompt structures that they know work reliably for specific image types.
Conclusion: The Skill Is the Prompt, Not the Tool
Access to ChatGPT and Gemini is not a competitive advantage in 2026 almost everyone has it. The advantage belongs to the people who have learned to use these tools with precision.
The six-element prompt framework, the advanced techniques of negative prompting and style stacking, and the discipline of iterating rather than settling for the first output these are the skills that separate AI-generated images that look professional from the ones that look like everyone else’s.
The practical starting point is simple: take one of the ready-to-use templates from this guide and apply it to an image you need right now. Note what the first generation gets right and what it misses. Make one specific change to address the biggest gap. Generate again. That iterative process, repeated across dozens of images, builds the intuition that makes this genuinely fast and reliable.
The tools will keep improving. The professionals who have already built strong prompting skills will benefit most from every improvement, because they understand the system well enough to direct it precisely.
References & Sources
- Adobe – 2025 AI Creative Trends Report
- OpenAI – DALL-E 3 Documentation
- OpenAI – Usage Policies
- Google – Gemini Advanced Overview
- Google – Terms of Service
- Canva – AI Image Generation Guide 2025
2 thoughts on “How to Generate Stunning AI Images in 2026: Complete Guide”